Here is a photo of our wedding cake. (Sidenote: It will be five years in October since Jesse and I got married!) It's a simple 3-tier chocolate mocha wedding cake with chocolate buttercream frosting. The only decorations are textured sides (applied by a decorator's comb) and rose petals. I checked my wedding receipts last night and confirmed the price Jesse and I paid--$404!
_ _ _ _ _ _ _ _ _ _ _ _ _ _ _ _ _ _ _ _ _ _ _ _ _ _ _ _ _ _ _ _ _ _ _ _
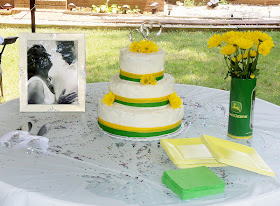
My goal was to create a 3-tier cake with a textured look and flowers, much like my own wedding cake but significantly cheaper. The reception theme was John Deere, but I wanted to keep it elegant. After lots of surfing the web, I found inspiration from this John Deere cake and this simple cake with flowers. I really knew nothing about wedding cake construction but I knew I didn't like the look of pillars in between each tier. After watching a series of Epicurious videos, I learned how to center tiers and stack using dowel rods. Each tier was two layers, baked in 6 inch, 9 inch, and 12 inch pans. The bottom layer was chocolate buttermilk; the top two layers were vanilla. The frosting was a basic vanilla buttercream.
My budget was $50. A.C. Moore allows you to print coupons for 40% off one item each day, so I bought 1-2 things per day. In addition to the daily coupons, they also offer 15% discount for teachers who show their ID. I purchased a 12-inch pan, cake leveler, green and yellow ribbon, corrugated cake rounds, the cake topper, and a cake lifter. I bought all of the ingredients at Wal Mart and yellow daisies at Harris Teeter. The final total was $54.
I had planned to take pictures of the whole process, but I somehow got the entire date wrong for the reception! For whatever reason, I thought I was supposed to be there at noon on Sunday, but the event was on Saturday. Thank God I had baked, wrapped, and frozen each layer the night before. I literally had an hour and a half to whip up a mega-batch of icing, then assemble, frost, and decorate the cake.
My biggest concern was how to transport the cake in the car for an hour in the summer. Each layer was completely frozen when I frosted it, so it stayed chilled despite the heat. I was a bit frantic once I realized my mix-up with the day. I haphazardly grabbed the recycling bin from the garage. I tossed everything out of it and rinsed it off with a hose pipe, then stuffed a towel in the bottom. Miraculously, it was a perfect fit and the cake transported flawlessly!
As far as decorating goes, the lack of time kept me from over analyzing or trying to add too much. I frosted it intentionally messy. I followed the tips from the online videos to stack each tier correctly (center each layer and add support). I took the ribbon and gently pressed it along the bottom of each layer so that it would have a nice finish with a pop of green and yellow. (Technically, I should have ironed on wax paper to the back of the ribbon to prevent grease stains, but I didn't have time.) Finally, I randomly placed the daisies along the sides and inserted the cake topper.
Here is the final set-up at the reception:


No comments:
Post a Comment