Yesterday I hosted a gingerbread house making party for a dozen of Jackson's friends. I looked all over Pinterest for tutorials on how to make graham cracker gingerbread houses. There were plenty of blog posts, but none that dumbed it down enough for me. I was disappointed to read that some women assembled their houses with hot glue! I wanted everything to be completely edible, so that wasn't an option. Thankfully it only took one poorly structured house before mastering it and making 15 solid gingerbread houses. (I made enough to include the trio.)
Since I'll probably forget all of this by next year, here is my thorough, step-by-step guide for graham cracker gingerbread houses.
To make 15 houses, I needed four boxes of graham crackers. Assuming you don't break a single cracker or make any mistakes, 4 boxes would be enough for 18 houses. There are 27 crackers in each box.
For the royal icing, I made a large batch using this recipe:
6 cups of powdered sugar
3/4 cup of liquid egg whites
1/2 teaspoon of cream of tartar
Add all three ingredients in a stand mixer.
Mix on medium speed for 5-7 minutes, until icing is thick and can hold its shape.

Each house requires six sheets. I used four whole sheets and two angled "gables".

I used graham crackers from Aldi. I don't know if this would work with other brands, but I used the three dots to make a diagonal line. Using a serrated steak knife, I gently sawed back and forth to cut the crackers. Following the diagonal lines ensured that every side piece was congruent. Since I was making 15 houses, I went ahead and cut all 30 sides before assembling the houses. They were easy to saw and no crackers were ruined.

I poured my royal icing in a plastic piping bag and snipped the tip off. (Tip: Don't cut too much of the corner off or you'll squeeze out too much icing.)
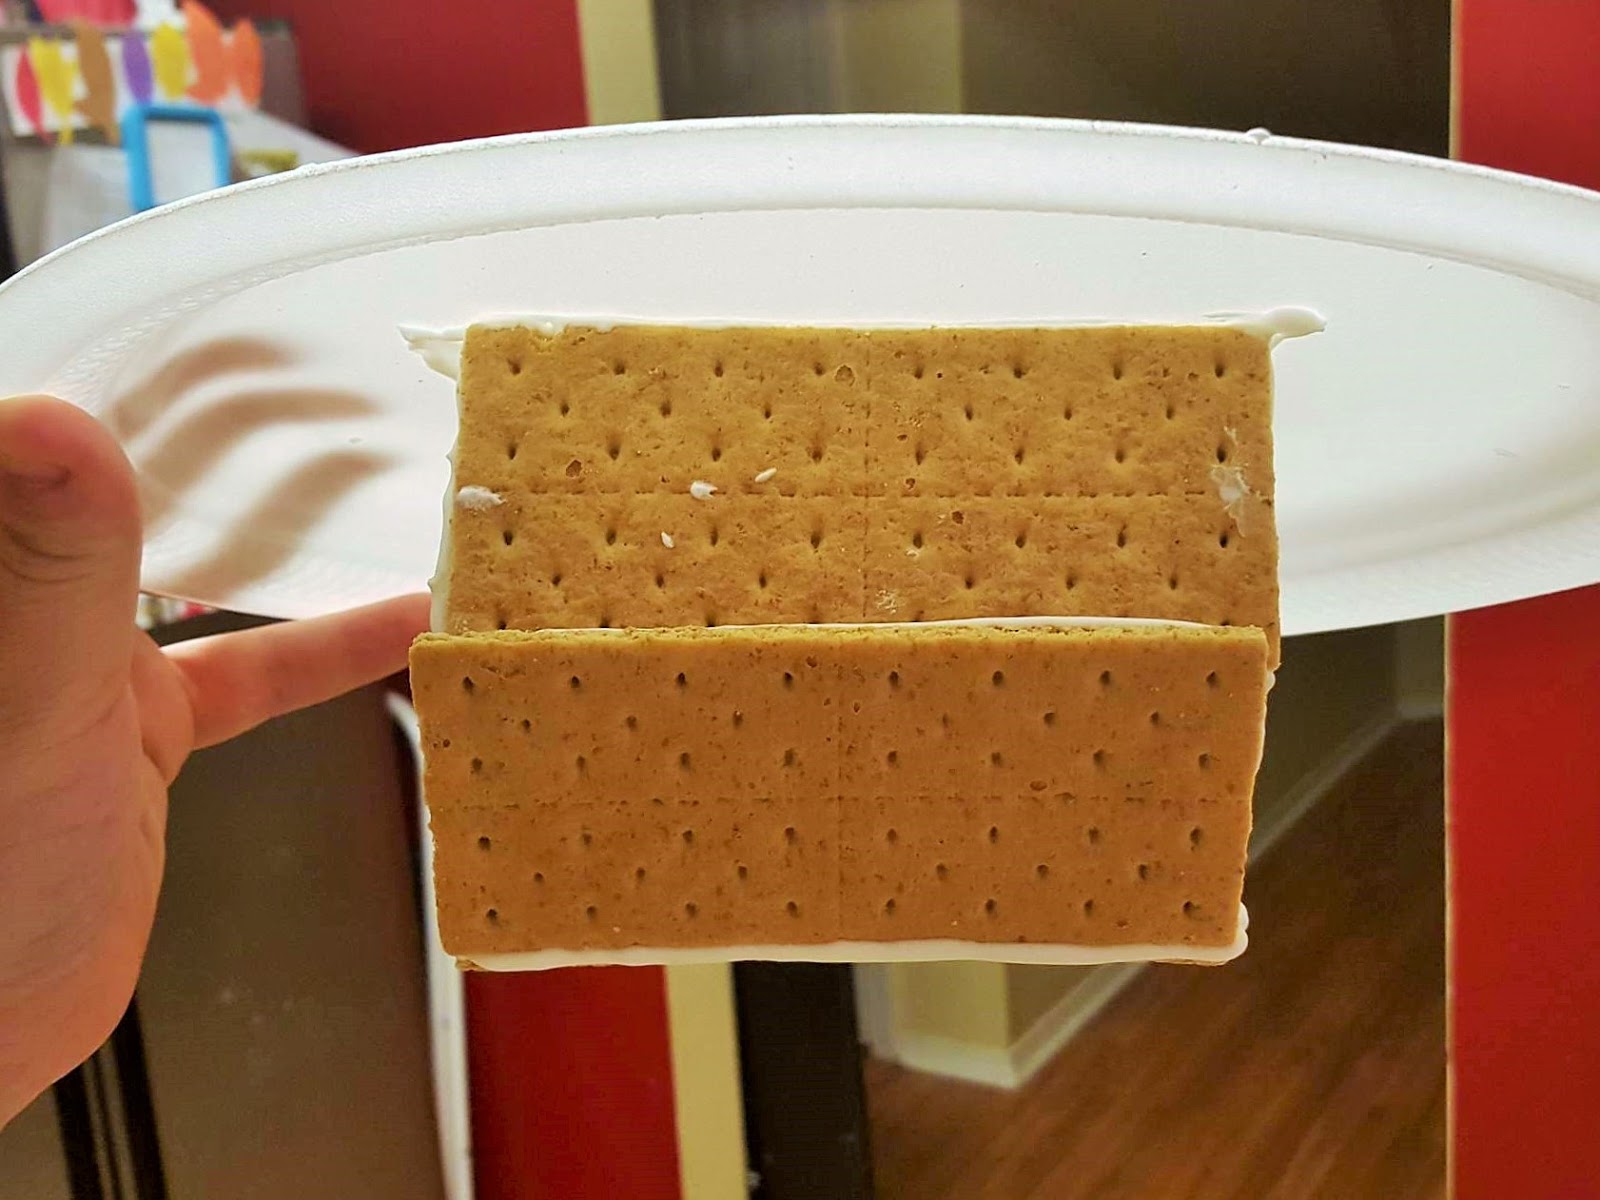
Here is where I had a bit of trial and error. With the first house, I put the gables on the outside. When I tried to adhere the roof, there was a gap and it kept falling through the house.

My second attempt proved to be successful by placing the gables on the inside. I piped icing along the inside edges of the long walls, then the outside edges of the gables. I don't know that it was really necessary to apply icing on both sides, but I read that listed as a helpful trick on another site. It compared it to applying wood glue to both sides of wood, making them adhere better. I didn't try it with icing only on one side, so I can't say if it would have been as strong, but I definitely didn't have any problems at all with the icing not sticking or houses collapsing.
The other optional step was that I applied icing to the bottom of each cracker so that it would stick to the plate. This was so I could assemble it quickly without holding it forever or using a milk carton as support. I also thought it would be helpful to have the house on the plate to make it easier to transport home (for those who didn't eat theirs).

As soon as I applied the icing on the four walls, I stuck them on the plate in this order:

I held it in place a for a few seconds before attaching the next cracker.


I made 15 roofless houses so the walls would have time to set, then went back and added the roof on each house. Again, I applied icing on each surface,

then held it in place for a few seconds.

And just for good measure, I piped one more line of icing on the top.

FYI, you can follow the same steps with four graham crackers and make a miniature house.

There was a lot of discarded pieces from the gables. They were at the right angle that I could have made chimneys for each of the houses. However, I was content with the houses as they were, and the toddlers were content eating the broken pieces.

I let the houses set while I decorated the table and made gingerbread cookies. (Technically, I made gingerbread men shaped sugar cookies because my kids think gingerbread is "too spicy".)

Forty-five minutes later, these houses weren't budging! They were definitely ready for dozens of young children, mostly between the ages of 2-6.
I asked my friends to provide the candy decorations. We had square pretzels for windows, Andes mints for doors, coconut for snow, colored baking M&Ms for lights, and the traditional gum drops, peppermints, red hots, etc. Jesse inserted the leaf in the table so we could seat 10 at the main table. I also had a card table for the trio. The two oldest siblings (both 5th grade girls) helped the trio. Here's the largest table before,

and "during".

Here's a sampling of some of the houses.

Just in case you're wondering, the houses peeled off the plate with some gentle force. I know some people like to make villages or display their houses. Our family prefers to eat them.

In addition to gingerbread houses, another friend brought everything needed to make ornaments. The older kids swirled drops of glue around the inside of glass balls, then sprinkled glitter along the inside. They were very simple and beautiful. Unfortunately, I was soothing three exhausted toddlers and didn't get any photos of the ornament making.
I absolutely love having parties for the kids. This will likely be the first of many gingerbread house making parties.
I could have used this tutorial December 1st...
ReplyDeleteI know! At least we'll have it for reference next year.
Delete